Archive for the ‘Pumps’ Category

XSPC D5 Dual Bay Reservoir Combo

Posted: December 6, 2012 in Pumps
Tags: , , , , , , , ,

This is review of the XSPC D5 Dual Bay Reservoir Combo. This is another “Durable” option in the bay reservoir pump craze. While XPSC has had a few acrylic options, this is an all new D5 model molded with a tough nylon material that is internally accessible for cleaning via one large top cover and it has a small acrylic window. Up until this reservoir option came out though, getting your hands on a more durable material option usually meant spending over $100, but not so here…it’s about half that. Any while most reservoir tops for the D5 so far have only made very minor improvements. This bay reservoir hit several notes in performance due maintaining a nice spiral shaped volute, removing much of the exit elbow, and improving the inlet port to a more desirable size.

A special thanks to Paul from XSPC for providing the review sample:

XSPC-DualBayD5Res-01

Manufacturer Specifications:

http://www.xs-pc.com/products/pumps/d5-dual-bay-reservoirpump-combo/

– G1/4″ Threads
– Brushed Aluminium Faceplate
– Tough Nylon Body
– 1x 5mm LED hole
– Individually Pressure Tested
– Capacity 300ml
– Dimensions: 149 x 85.6 x 105mm

Supplied with black faceplate, 8 screws, and blue LED.

Swiftech MCP35X2 Pump

Posted: January 29, 2012 in Pumps
Tags: , , , ,

Introduction

Welcome to my Swiftech MCP35X2 review, possibly the ultimate in “Smart PWM Monster Pumping Performance”. After reviewing the Swiftech 35X single pump, I found myself making room for the powerful smart pump as part of my daily use and CPU block testing rig.  While manual speed control pumps move water fine, they can not be controlled automatically without more advanced (and expensive) controllers.  PWM controlled pumps offer a larger operating range and can be controlled with nothing more than a motherboard CPU header.  Just before CES 2012, Swiftech announced an arsenal of exciting new and innovative products, one of which was taking the previous flagship 35X success and marrying it together in a package of two (The MCP35X2). Two pumps in series provides nearly double the head pressure and also adds the pump redundancy safety benefit if one pump stops working. When Swiftech asked if I’d be interested in reviewing, I was happy to accept as I thought it would also make the perfect test pump for my new radiator test bench having all that range, power, and precision(easily repeatable) PWM control.

I would like to give special thanks to Gabe from Swiftech for providing this product review sample:

That’s a lot of smart PWM pumping power in the palm of your hand.

Before digging into the review, let’s first have a look at the product specifications and notes from Swiftech’s site:

Specifications
  • Small Footprint: L4.9″ x W2.8″ x H1.6″ (L126 x W72 x H41mm);
  • 50,000 hours MTBF (Mean Time Between Failure) ;
  • 12 Volts DC convenience: plugs into the computer power supply
  • Variable speed control via PWM thru the motherboard, from 1300 rpm for completely silent operation, to 4500 rpm for ultra high flow performance;
  • Simultaneous pump speed control using one PWM motherboard header is achieved using the included PWM splitter cable.
  • Superior head pressure and flow rate (in the useable range) to any pump in its footprint: the X2 features twice the head pressure as the MCP35X.
  • G1/4″ ports standard for compatibility with a large assortment of fittings;
  • No maintenance when used with distilled water, and anti-fungal additives (our HydrX additive is recommended);
  • Quick installation with adhesive neoprene pad, or permanent installation with supplied hardware;
  • Optional “built-in” MCP35X-Res reservoir;
  • Ready for upcoming 5 1/4″ bay reservoir solutions by Swiftech.
  • 2 year warranty
Product Description
The MCP35X2 is the dual motor version of Swiftech’s flagship MCP35X pump. The product is designed to provide extreme flow rates in loops that include multiple devices, for example multiple radiators and triple or quad SLI/Crossfire liquid cooled graphics cards; pump redundancy also provides maximum safety in mission critical systems: if one pump fails, flow will continue to circulate thru the system thanks to the second pump. The unit features:
  • The MCP35X2-H dual pump housing:
    • designed to provide considerably enhanced hydraulic performance;
    • compatible with multiple tubing options thanks to the G1/4 port standard;
    • compatible with the optional MCP35X-Res reservoir;
    • available in two colors; classic black or fashionable white
    • also sold separately, and compatible with all MCP35 series pumps
  • Two MCP35X pump motors:
    • 12VDC and PWM controlled, allowing variable speed control thru the motherboard from 1300 to 4500 rpm, and linked with Swiftech’s PWM splitter cable for simultaneous pump speed adjustments using only one PWM motherboard header.
Technical Specifications
Motor type 2x Electronically commutated, brushless DC, spherical motors
Nominal voltage 12 V DC
Operating voltage range 9 to 13.4 VDC
Max. nominal power (@12 V) 18 W x 2
Max. nominal current (@12 V) 1.5 A x 2
Max. nominal head (@12 V) 27.9 ft (8.5m)
Max nominal discharge (@12 V) ~ 4.17 GPM (15.8 LPM)
Maximum pressure 22 PSI (1.5 BAR)
Temperature range Up to 140 °F (60 °C)
Electrical power connector 2x Molex 4 pin
PWM + RPM Signals 2x 4-pin connector
RoHS Compliant
Port thread standard G1/4
MTBF 50,000 Hours
Weight 15 oz
Dimensions (not including fittings) L4.9″ x W2.8″ x H1.6″ (L126 x W72 x H41mm)
That’s a lot of goodness and technical information to absorb that I’ll work on going over as I complete the review.

Here we have another “Smart” pump for water cooling, and one that is built by Eheim and Aquacomputers, the aquastream XT. Not only does it pump, it’s the only pump capable of being manually or automatically controlled via software, monitor’s water temperature, and it can also control the speed of one 5W fan channel (or a poweradjust 2 for 25w).  While there are a few smart pumps that can control pump speed, this is the only one I’m aware of that incorporates a full software suite and control of so much.

A special thanks goes out to Shoggy of Aqua Computers for sponsoring this pump!

He included it as part of the Aquareo 5 package I’ll be reviewing soon following the pump in flow meter.

Packaging

Who doesn’t like un-boxing new products?  Perhaps it’s growing up celebrating Christmas, but to this day I still enjoy this and perhaps why I still like doing these reviews.  Besides the normal surprise element, I think it’s also important that products are packaged well and accessories can make a difference.    The Aquastream XT ultra comes in a nice 6″ x 6″ x 5″ color printed box with various bits printed on the exterior.

Below are the specs printed on the box:

The specs check out well, and I would take note of the “automatic frequency adjustment”, this is a rather unique feature of this pump that causes the pump to restart on occasion as it’s testing the restriction level and tuning the pump.  This is intended to ensure the pump operates at the best operating point which should ensure the pump can’t overheat and also turns up the speed when restriction is present.

And there are multiple versions of the pump, and those differences are fairly well outlined below.  The model I’m reviewing here is the higher end “Ultra” flavor.

The bottom five features are what really makes this pump interesting for me, since it does much more than pump.  These features basically makes it an advance fan controller.  You can hook up a flow meter, fans, external temperature sensor, and monitor/control it all including the internal water temp sensor using software.  That’s considerably more “Smart” that pretty much any other pump I’ve used.

Upon opening the box presents:
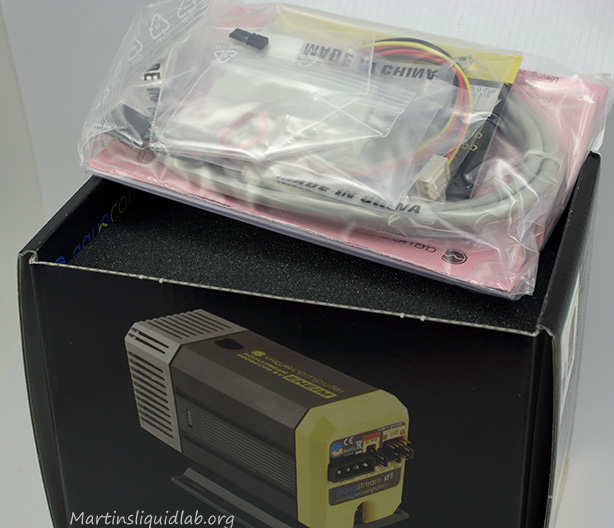
Pulling out the soft foam casing reveals the pump:

I’m impressed by the foam protection here, that’s probably the best protection I’ve seen on any pump reviewed before.

Pulling it all out gives the following contents:
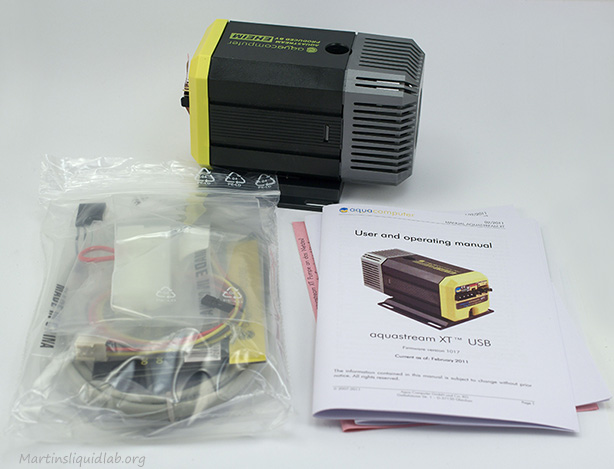
The USB cable on the upper left, the RPM monitor cable upper right, PSU jumper lower right, and aeration jumper lower left.

There were several bits of paper, most of which are written in other languages, but there is an English manual that’s fairly detailed and nicely done.

So that’s the package, but before going too far you should know that you need this accessory.  It’s a shame it’s not part of the pump box package as you pretty much need this for standard water cooling use where G1/4 is the standard.  This adapter kit is necessary to convert the larger inlet and smaller outlet ports to standard g1/4 water cooling fitting size.  AC sent me one, but don’t forget it; it’s a must-have extra.

Impression of the packaging was very good although I think the adapter kit should be a standard part of the package.  The pump was extremely well protected and the overall presentation was done fairly well.  The user manual was also done well and a welcome and somewhat necessary addition since this pump does soo much more than just pump.
Welcome to another bay reservoir review, the Koolance RP-401X2.  I thought the RP-402×2 was compact for two pumps in a double drive bay size, but this model takes that concept up another notch.  The PMP-400 (DDC3.25) pump motors are very compact and Koolance figured out a way to put not only one, but two motors in a single drive bay reservoir that retains much of the same multitude of options as the 402×2 flavor. You can run one pump only and share both reservoirs, you can run two pumps in separate loops, or you can combine the two pumps via their serial kit for extreme pumping power.

A special thanks to Tim from Koolance for sending over the sample to review.

Packaging & Accessories

First let’s have a look at the box opening:

It comes in a longer brown box as shown here with solid foam protection along the sides

Having done a few drive bay reservoir reviews, it should be noted that not all come fully assembled.  The Koolance RP-401×2 is of the fully assembled and ready for pump status types.  It also has a block off plate installed on the left (P2) side and plugs ready for a single pump installation.  This keeps the number of loose parts down to a bare minimum and should save some time up from on the assembly front.

No major assembly required, ready for single pump right out of the box

It does also come with what I would call a quick guide.  It’s a smaller double-sided black and white four page guide.  Don’t expect a ton of detail here, but the guide is well illustrated and covers the key installation areas well although I would have liked to see some added info on bleeding. You can download the electronic and color version of the manual here for a more detailed look.

In general the package was very complete short of barbs and the serial kit.  Those items will have to be purchased separately and are an added cost.  The reservoir/top does come fully assembled with the necessary port plugs and pump block off so you can run one or two pumps as desired and there isn’t any assembly needed which is also nice.  The Packaging and protection also seems good and arrived in good condition.

This is a continuation in evaluating ways to cool our popular DDC series pumps.  While requesting a sample of the Apogee XT CPU block, Swiftech offered to send me a sample of their newly released heat sink the Swiftech MCP35X-HS.   A special thanks to Stephen & Gabe from Swiftech for providing the sample to review.

As part of my pursuit to better understand heat within these pumps, I previously completed the DDC3.2 Heat Scoping blog to prepare for testing such as I’m doing here with this heat-sink.  This heat sink is compatible with any DDC series pump that has two holes in the base.  This includes both bases with cast feet as well as the newer bases that come without the spread foot base.  The heat sink is intended to serve in both cooling capacity as well as pump decoupling for improved noise response.

Packaging & Accessories

Being a heat sink, the parts are fairly basic and limited.  The package comes in Swiftech’s typical black box with a white printed label.

Upon opening the box, the heat sink itself is wrapped in a layer of paper that is also wrapped in a bubble wrap bag.  Everything else is nicely put away in individual bags.

Taking everything out of the protection bags reveals the contents as you can see below:

In the above photo, the blue thermal pad is to the left, lower left are the lifting legs (foot post), lower middle are the rubber feet that attach to the base of the legs(rubber bushings), and the lower right are the four machine screws that attach the rubber bushings to the foot posts.  The two remaining screws are used to attach the heat sink to the base of the pump.  Assembly only takes a few minutes and does not require opening the pump.  The thermal pad doesn’t even have to stick to the pump as the bottom.  Blue side facing up is not sticky, white side down sticks to the heat-sink.

Assembly is very straight forward and simple.  Not shown, but the thermal pad has a blue side which faces up (Non sticky) and a white side that is stuck to the heat sink.

This is what the heat sink looks like mounted to a MCP-35B pump without any fan installed.  This wasn’t the pump I tested on since it was only a 12W motor (less heat than 18W motors), but it’s a nice looking top which compliments the heat sink black theme and represents what the heat sink would look like on either the MCP-35B or the MCP-35X pumps with black delrin/acetal tops.

 There is a bit of extra space down below without a fan installed, but this also helps allow a nice amount of case airflow to whisk away the heat better.  Also notice how the rubber feet serve in decoupling the entire unit.