Posts Tagged ‘Review’

Welcome to my round 11 fan testing.  This is a fairly small round of fans from the kits I previously tested.  Rather than do my normal written form, I’m trying to do this more video based.

Before I do that, I would first like to thank my parts sponsors, without their support this test wouldn’t have happened:

Logo-FrozenCPU

Swiftech_logo_white_backgrounds

Kit Fans Intro

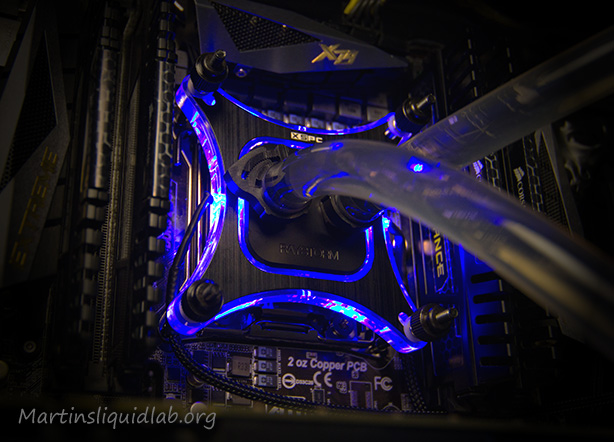
This video does some physical comparisons of the fans and gives you a good close up look of the fan, sleeving, build quality, etc compared with my previous best performing fan the Gentle Typhoon.

Fan Test Rig Description

This video is just a quick overview of the flow bench and meters used in the fan testing to follow.

Individual Fan Tests

The following videos are of the actual test run on each fan recorded with audio and stepping through 50FPM air flow results.  You can now easily adjust two or more fan videos to like air flow numbers and pause them both, then switch back and fort for a direct apples to apples air flow comparison.

Larkooler Kit Fan

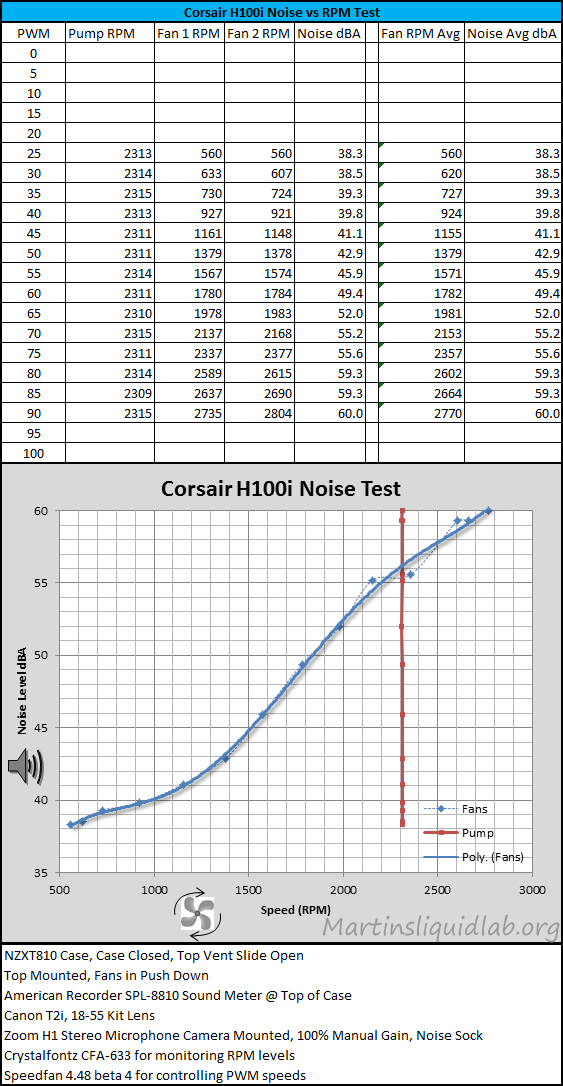
Corsair H100i SP120 Kit Fan

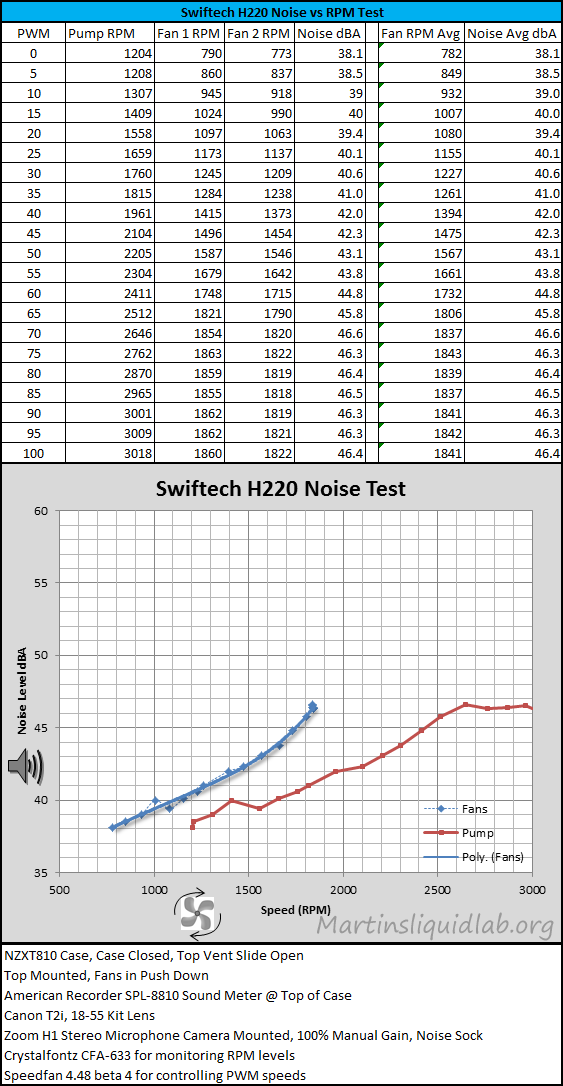
Swiftech H220 Kit Fan

XSPC 750 Kit Fan

Servo Nidec Gentle Typhoon AP-15
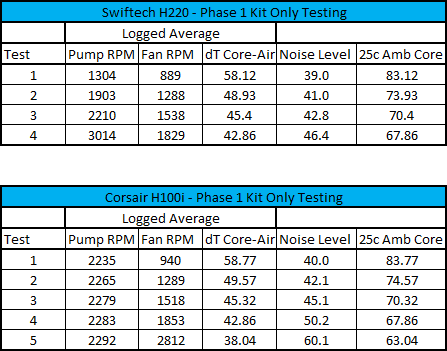
Extracted Results

These were pulled from the video, by isolating a looped region where air flow was close to the 50FPM increment.  This provides the resulting detail read on the meters and a calculated RPM.  On the right are some subjective noise quality comments I added as I reviewed and extracted the results.

R11-FanTesting-Detail

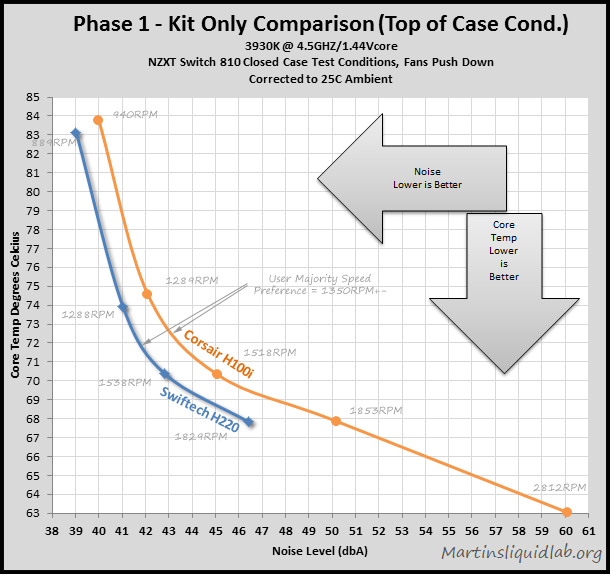
Summary Radiator Noise Level vs Radiator Air Flow

This is the “Meat & Potatoes” result.  While I wish I could measure noise quality in a good quantitative way, that’s really not possible.  The next best thing is to compare noise levels when mounted to a radiator at like air flows through that radiator.  It takes into account the fans pressure capabilities and puts it in a more real world condition.  It’s not perfect, but the best thing I’ve been able to come up with to simplify radiator noise performance.  Fans that extend further right are capable of higher air flow maximum results at 12V.  Fans with lines lower on the Y axis are producing more air flow per noise level.

R11-FanTesting-Summaryl

No real surprise, but the kit fans all tested relatively the same (most within 3dbA or less differences which fall within the “barely perceptible” level).  The Helix fan did for some reason have a bit higher than expected harmonics on the radiator bench which didn’t seem to be as noticeable when actually testing in a case, but it is something I heard a little when trying push only.  In push+pull I noticed most of that helix harmonic disappeared.

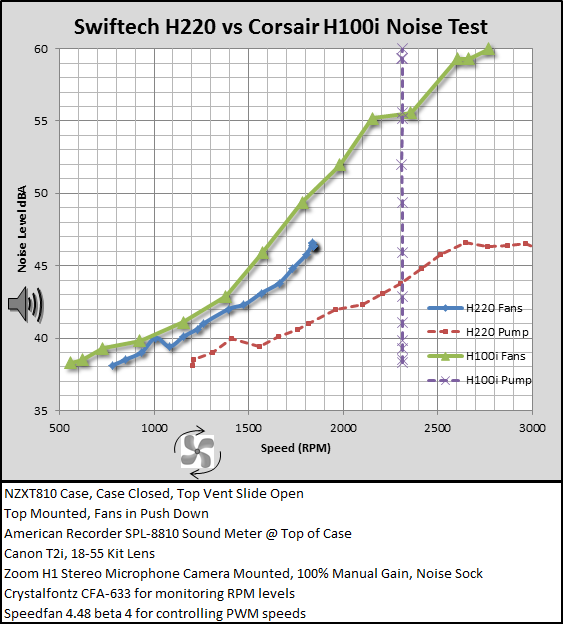
I would consider the kit results to be relatively similar, they are like most fans and all perform roughly the same.  The Gentle Typhoon however does seem to retain that unique ability on a radiator and tested upwards to 8-9dBA lower in noise level at 12V than other fans producing the same flow.  The H100i fans and their 2700RPM capability did produce the highest maximum air flow, but it comes at the prices of having a fairly gritty noise quality.  Noise quality isn’t captured well in the graph and really only something you can listen for in the videos.

The other aspect I’m now noticing that is missing from this single fan test bench is harmonics between the two same fans.  In the thermal testing using the kits and earlier noise testing, I had significant RPM harmonics issues with the H100i fans, but a single fans test scenario completely misses that.  This is something I seriously want to consider in fan flow bench future upgrades.  I think it is important to capture the “paired fan” harmonics effects as it can be fairly significant.  The helix H220 fans did really well paired together in the kit testing, but you just can’t see that in a single fan test.

Also as noted some of the pressure harmonics issues can also be mitigated for by going push + pull.  The helix fans don’t show real well in this single push test, but I found when testing four fans in push/pull on a radiator the fans worked very well together.  They are not up to Gentle Typhoon silence or build quality standards, but in use I would say they fair better than what the above chart or single fan test result demonstrates.

I also think the Larkooler fan subjectively sounds quieter than the produced dBA.  I’m not sure how to describe it, but the sound type is more lower in frequency and seem to contain less motor noise and gritty noise that is more prevalent in the other fans.  It has a noise quality that reminds me of the noise blocker series which I’ve always liked.  Noise level doesn’t measure anything special, but I think this fan does have pretty good noise quality particularly at slower speeds.  This is another one where my own ear and the meters don’t really agree all that well..:)

This at least gives you one more perspective on the sound.  I would suggest listening to the fans at like air flow levels and make a decision not based on noise level, but what you perceive as being less irritating.  That is likely a combination of frequency, noise quality, and noise level.  Don’t put too much weight on the noise level, it is important, but it’s not the entire picture and each person and each setup will be slightly different.

So there is another round and the Gentle Typhoon retains it’s low noise/rad air flow ratio crown.  Nothing comes close…

Welcome to the fourth kit in my value <$150 2x120mm radiator kit series, the Corsair Hydro Series H100i CPU cooler. Corsair has been in the sealed AIO cooler business for a while and although I personally have never had the opportunity to review any of the kits before, I’ve seen the forum following grow over the years so I expect good things. A good following and user base is no accident and usually means good things. I also very much enjoy my Corsair TX650 power supply and regularly run Corsair memory such as my current Vengence memory due to the quality of parts and consistent good result I’ve had with Corsair products. They also have a good reputation for customer service and honoring warranty issues and that means a lot to me as well. When I decided I wanted to do kit testing, the H100i was on my short must do list due to its popularity and amazing low price of just $119. While the H100i doesn’t come designed for expansion due to it’s sealed nature, it is the lowest priced kit with a 240 sized radiator and had the longest warranty so I was very interested in reviewing.

Corsair-H100i-02

Here is a quick picture of the kit

Frozen CPU Product Information

http://www.frozencpu.com/products/17765/ex-wat-236/Corsair_Hydro_Series_H100i_High_Performance_Dual_Radiator_CPU_Cooler_CW-9060009-WW_-_Sockets_LGA_775_1155_1156_1366_2011_AM2_AM2_AM3.html

Product Description

Have a PC case that supports a top-mounted 240mm radiator? Take your CPU cooling to a new level. H100i starts with the advanced design of the Hydro Series H80i, and adds a double-wide radiator for even better performance.

Monitor temperature and control lighting and fan speed on your screen. No additional hardware is necessary using the Corsair Link

Features

Self-contained Cooling System

  • Hydro Series H100i comes pre-filled, and never needs refilling or priming.

Dual Radiator with Custom Fan Design

  • The 240mm top-mounted radiator provides maximum surface area for maximum cooling power. The 120mm fans use wide, low-pitch blades for better static pressure to noise ratio, offering improved efficiency at lower noise levels.

Built-In Corsair Link

  • No additional hardware is necessary – just connect the included Corsair Link cable to a USB header on your motherboard and download the free Corsair Link Dashboard software. You can monitor coolant temperature and adjust cooling performance directly from your desktop.

Tool-free multi platform magnetic mounting bracket kit

  • The modular design makes installation simpler, and it’s compatible with Intel and AMD processors.

Large-diameter, low permeability tubing

  • Minimal coolant evaporation helps ensure long life, and the resilient material offers both high flexibility and excellent leak protection.

Technical Specifications

Technical Specifications
Radiator dimensions: 120mm x 275mm x 27mm
Fan dimensions: 120mm x 120mm x 25mm
Fan speed: 2700 RPM
Fan airflow: 77 CFM
Fan dBA: 37.68 dBA
Fan static pressure: 4mm/H20
Compatibility: Intel™ LGA 1155, 1156, 1366, and 2011
AMD™ sockets FM1, FM2, AM2, and AM3
Hydro Series H100i requires a case with dual 120mm fan mounts with 15mm spacing for a 240mm radiator
Package contents: Corsair Hydro Series H100i High Performance Liquid CPU Cooler
Magnetic Multi-platform mounting kit for all modern CPU sockets
Dual SP120L High Performance Fans
USB Cable for Corsair Link™ Compatibility
Fan and radiator mounting screws
Thermal compound (pre-applied)
Quick Start Guide

So as already noted, the 5 year warranty stands out for me as does the 2700RPM fans.

What it doesn’t specify and what I found out during the review is the lack of Window 8 support in using the Corsair Link software when I did my testing on this unit.

I did just double-check the corsair website and now that I have removed the H100i for other unit testing, it does appear that corsair link is now finally 5 months later, supporting windows 8. If you go to the downloads section, you will now see that the latest software is supposedly supporting Win 8. That has recently been updated.

http://www.corsair.com/us/cpu-cooling-kits/hydro-series-water-cooling-cpu-cooler/hydro-series-h100i-extreme-performance-liquid-cpu-cooler.html

Also worthy of note for those thinking of modding the kit, the radiator is “aluminum” so any sort of mods will require a corrosion inhibitor because of the mixed copper/aluminum metals.

When I stop to think about watercooling for a bit, I see two basic performance reasons why I like it .  One reason is the performance of it, I can overclock higher than with air.  The second and probably more critical to me is the performance per noise level.  Perhaps I’m getting more noise critical in my old age, but listening to a vacuum cleaner in the background is not at all acceptable or what water cooling is really about.

I can test performance and log RPMs, but that’s really not apples to apples either.  Some fans have stronger PQ curves at like RPM levels and there is also a large variety of noise quality differences.  How a fan interacts with neighboring fans can be both good and bad and box specs simply do a poor job at measuring noise levels in an actual case/radiator condition. IMHO, a review of performance without a measurement of noise is no different than testing one radiator with 1800RPM and the other with 2700RPM and calling it a review.  You can compare like RPM levels as a quick and dirty test, but that too is generally a poor measure since fan performance can vary by as much as 400RPM producing the same air flow.  To do a review and comparison correctly, you really need to measure and compare noise vs dT or noise vs Core temp or some sort of constant. That’s what I’m attempting to do with this first noise testing phase.  I am also retesting in a top case mount condition so all kits get a equal and fair condition.

I started this kit testing using the bottom mounting location on my Switch 810 however I encountered a problem when trying to install the H100i….the hoses are about 2″ too short.  I’ve done enough testing to know you can NOT change the condition, no matter how small between tests.  A simple thing like placing the case on carpet vs a hard surface is enough to throw results out by 2C, same goes for noise measurements.

So in an attempt to get a true apples to apples noise vs DeltaT, I first need to compare noise vs RPM and then in Delta T testing I can convert the logged RPM average to noise level.

Unfortunately, Corsair Link is not compatible with Windows 8, so my only means to control the unit at all was to use the PWM fans and control speed via speed fan. Corsair Link simply does not monitor or control anything H100i related if you are running windows 8 as of this testing which was a bit of a surprise to me.  I believe Win8 has been out since last October so a good 5 months later, still no Win8 support.  Oh well, it really didn’t bother me since the new kit fans do have 4pin PWM control. At least I could control fan speeds using the motherboard and speed fan, I just needed to use a PWM splitter.

Corsair H100i VIDEO

Swiftech H220 VIDEO

That is what I have so far, I will let your ears do the talking… As a place holder you may start and stop both videos to match up RPMs if you would like and simply play one, stop, then play the other back to back.

Corsair H100i Chart

CorsairH100i-NoiseVsRPM

Swiftech H220 Chart

SwiftechH220NoiseVsRPM

RPM Comprarison

CorsairH100ivsSwiftechH220N

dBA Chart

For reference use this to compare to similar daily noise types:

Sound sources (noise)
Examples with distance

 
   Sound pressure
Level 
Lp dB SPL
 
 Jet aircraft, 50 m away 140
 Threshold of pain 130
 Threshold of discomfort 120
 Chainsaw, 1 m distance 110
 Disco, 1 m from speaker 100
 Diesel truck, 10 m away 90
 Kerbside of busy road, 5 m 80
 Vacuum cleaner, distance 1 m  70
 Conversational speech, 1 m 60
 Average home 50
 Quiet library 40
 Quiet bedroom at night 30
 Background in TV studio 20
 Rustling leaves in the distance 10
 Hearing threshold  0

Using the following chart for perceived noise level differences:

Perceptions of Increases in Decibel Level
Imperceptible Change 1dB
 Barely Perceptible Change 3dB
Clearly Noticeable Change 5dB
About Twice as Loud 10dB
About Four Times as Loud 20dB


Top Mount Noise vs Core Comparison

While I only have the H100i for comparison at this point, this is how that combination of noise testing and thermal testing lays out.  This is the meat and potatoes results as it pulls out all the variables such as fan performance vs RPM differences and compares a direct apples to apples noise vs performance.

Swiftech-H220-TH-27

And that plots out like this:

Swiftech-H220-TH-29

I’ve conducted a few different fan polls in the past before moving forward with radiator testing and typically the majority of watercooling users out there were using fans at about 1350RPM with a distribution that predominantly covers the 1000-1800RPM range.  There are a few people that run higher speeds, but the vast majority are more in the 1000-1800RPM range.  That makes sense as those speeds are only producing noise levels in the lower 40s dBA which is acceptable by most.

With that “Silence” preference in mind, the Swiftech H220 did outperform the Corsair H100i by roughly 2dBA at the 1350RPM mark, and about 3-4dBA better at the 1800RPM mark.  The H100i does have higher speed capabilities, but at 60dBA you are approaching vacuum cleaner noise levels (70dBA).  There are some users that don’t care about noise though, so I’ll leave it to you on what’s important.

For me personally, minimum noise level, dynamically throttling the noise and performance, and a smooth noise is priority.  I find the H100i fans (like most high speed fans) to produce quite a bit of motor noise and there was quite a bit of harmonics between the two fan RPMs that generally produces a poor noise quality.  The H220 helix fans are for the most part fairly smooth and the sound quality blended in well with my other fans.  That’s not to say you couldn’t replace the kit fans with something better, but in spirit of testing kit vs kit, the H220 is king of silence (minimum noise level) and better at like performance levels by 1-4 dBA over the H100i.

Welcome to the third in my series of 2x120mm under $150 value series kit reviews, the Larkooler iSkyWater 300. Larkooler is a fairly new brand to me as I haven’t had a chance to review any of their parts or pieces individually. Unlike the XSPC kit which left me running to the grocery store to get distilled water, this kit is complete with fluid and everything you need to put your system together. Also unlike the sealed AIO units such as the Corsair H100i which are sealed and not intended for expansion, the Larkooler iSkyWater 300 is DIY and there are VGA block and Ram block accessories intend to go with this kit for expansion possibilities. Also unlike the sealed kits where tubing is already connected and sealed, the Larkooler kit comes with external radiator mounting brackets and designed to be mounted internally or externally depending on your case needs. At $129.95, that makes this kit extremely low-cost, compatible with most cases if external mounting is desired, and expandable which we all like. We’ll put it to the test in this next review and see how it stacks up to similarly prices 2x120mm radiator sub $150 water cooling kits.

Before going to far, I would like to give special thanks to Mark from FrozenCPU for sponsoring this kit, they are your one-stop-shop for all PC modification supplies!

Logo-FrozenCPU

Larkooler-iSkyWater-300-01

FrozenCPU Product Information

http://www.frozencpu.com/products/15141/ex-wat-155/Larkooler_Universal_High_Performance_Complete_CPU_Liquid_Cooling_Kit_BA2-241_-_LGA_2011_Ready.html

Product Description

Larkooler is a new generation cooling system for desktop computers. It is designed with the best cooling solution for the most important component of your PC, the CPU. This kit includes everything you need to get started. A pure copper block for maximum heat absorption. One 24cm radiator with two 120x25mm fans. Last is the tubing and cooling fluid. The VGA, Chipset and Mosfet blocks can be added to upgrade performance. The iSkyWater 300 provides a reliable low noise, high performance liquid cooling system. Literally every EVERYTHING you need is here in this kit!

Instructions Manual (.pdf)

Specification Sheet (.pdf)

Note: Radiator color is now black.

Features
  • Most Cost-Effective CPU Liquid Cooling
  • Very High C/P
  • Supports INTEL LGA775/LGA1156/LGA1366/LGA2011
  • Supports AMD Socket 754/939/940/AM2/AM2+/AM3
  • 3D Micro-Structure Thermal solution adapted, outstanding heat dispersion under very low water flow.
  • Supports most CPU like Intel i7& AMD Phenom II processors.
  • The universal type strengthened backplate not only prevents MB distortion but also has high compatibility for all kinds of MBs.
  • Easy installation due to 2-way tubing design which also enables upgrade to series connection of more water blocks.
  • Highly polished base to ensure excellent surface contact with heat source.
  • Fitting with refrigeration-and- air-conditioning-class structures provides high performance heat dispersing at low noise.
  • Easy installation design and back mounting bracket let DIYers enjoy DIY.
  • Specially designed bolts and nuts to prevent tube’s looseness and coolant leakage.
  • Pump with refrigeration-and- air-conditioning-class structures provides low-water warning.
  • Steady and silent working.
  • Easy installation design brings more fun to DIYers.
  • Specially designed bolts and nuts to prevent tube’s looseness and coolant leakage.
  • Thread upgradable to be compatible with G1/4″ water cooling system
Specifications
CPU Water Block
Dimension: D45xH29mm
Weight: 180g
Material: Pure Copper
Pump
Dimension: 100x70x82mm
Rated Voltage & Current: DC12V/0.41A
Weight: 330g
Flow Rate: 72L/Hour
Max. Water Lift: 200cm
Radiator
Dimension: 35x124x302mm
Material: Copper tubes with aluminum fins
Fan Speed: MAX 1800 RPM
Fan Connector: 3 pin
Fan Max. Air Flow: 62.7CFM
Noise: 31.1dBA
Life Expectancy: 50000 hrs at 25°C
Tank
Capacity: 150ml
Coolant
Main Composition: water & propylene glycol
Volume: 250 ml
Anti-freezing: -5°C
Tube
Dimension: OD8mm / ID 6mm
Length: 200cm
Material: PU
Max Operation Temperature: 50°C
Supports
Intel: LGA775/LGA1366/LGA1156/LGA2011
AMD Socket: 754/939/940

Description/Spec Thoughts

One of my initial worries was seeing the aluminum fins thinking the radiator was aluminum, but it is NOT. The radiator uses round copper tubes with aluminum fins pressed over the round tubes, but the critical part contacting water is all copper. The block is also copper, so no worries about mixed metals, the kit is all good copper/brass metals.

Pump

The pump has a good 2m head static pressure rating, however the 72LPH max flow rating converts to .26GPM, so it’s more of a high pressure but very low flow pump. At the rated .41Amps that makes this about a 5W max pump which is a good amount of power compared to AIO sealed units which are down in the 1-2W range. We’ll see how it does in operation. I did find this searching the net:

One more pretty cool feature in looking over the box, is the pump has a “Low Water Level” warning function, and of course you could easily connect multiple pumps in series as they show below:

Fitting Compatibility

The other “Mostly” good feature is the G 1/4″ threading compatibility. This is great for the block and radiator which all include the standard female G1/4″ threading so you can use your own barbs, BUT…the pump does not. The pump has male cast 6mm ID barbs with compression fitting threads which are intended to fit 6mmID x 8mmOD tubing. So you are a bit stuck with the smaller tubing size and fitting style with the pump, but the rest of the system could utilize custom fittings.

CPU Block

Digging further on the CPU block I actually found “SCIENCE”!! This does show how the block is very capable at very low flow rates:

Source: http://www.larkooler.tw/CWB-10.htm

For Reference: 1000ml/min = 0.26 GPM

Case Compatibility

Also not really advertised in the specs, but something I really like is their external radiator mounting brackets. For users who have a small case that may not support a 240 radiator, they give you nice brackets that could be used to install a radiator externally to the back or top of the case which increases case compatibility significantly.

Source: http://www.larkooler.tw/RX-240-radiator.htm

Warranty/Lifespan

The radiator has a 50,000 hour lifespan. The Warranty period at 1 year is also a bit less than the H220 3 year warranty or Corsair’s H100i 5 year warranty.

That’s not to say warranty matches actual service life, I just prefer seeing pump MTBF ratings and warranty for a few years.

Overall, quite a bit here to review and some promising specs and features for such a value priced kit. We’ll start next with the unboxing.

Logo-FrozenCPU

Welcome to my second value ($100-$150) 2 x 120mm water cooling kit review, the XSPC Raystorm 750 RS240 DIY Water Cooling Kit w/ Free Dead-Water. These XSPC kits have been very popular among the forum users due to their extreme value and good Do-It-Yourself parts. This kit is very much DIY-custom regarding installation and does not come pre-filled like the AIO units such as the Corsair H100 or Swiftech H220. It does however come packed full of value and the performance level we expect from a DIY-custom water cooling parts.  Unlike the sealed AIO kits with their tiny little 1-2watt pumps intended for CPU only needs, this kit affords you flexibility and enough pumping power (6W) to expand later to include a GPU and extra radiator.  It also provides your usual DIY flexibility in allowing custom barbs/compression fittings and any flavor tubing you want to suit your custom build needs.  Last but not least, it comes in a mostly individual component package (Except for pump/reservoir combo) that makes future upgrading things like the CPU block less costly.  XSPC wraps all that up with some additional visual bonuses such as blue LED modules for both CPU block and reservoir that does add some nice visual flare to your custom water build.  The kit also comes at the ready with extra hardware to mount external radiators which is something those AIO kit’s just can’t do because you need to route tubes through case walls, etc.  In the end it provides you with a big box of water cooling goodness intended to start you in the journey of water cooling without breaking the bank and retaining as much flexibility in installation as possible.

This review is a “LIVING” review as I’m still in the process of testing and writing up the results.  If you have testing or review request, please post in the comments. 

A very special thanks to Mark from FCPU for sponsoring this XSPC Raystorm 750 kit, your one-stop-shop for all your PC modification supplies.

Logo-FrozenCPU

XSPCRaystorm750-01

A quick photo of the Kit’s Raystorm block in darkness action!

Product Description

The XSPC Raystorm RS240 Extreme Universal CPU Water Cooling Kit comes complete with everything you will need to cool your CPU. This kit is designed to handle your CPU and can be expanded to handle more blocks as well.

The kit uses the newest XSPC CPU block, the Raystorm as the core cooling component. This block has a pure copper base and is a top of the line in performance and looks. XSPC coupled this with their RS240 radiator which is a thin profile radiator giving more flexibility with compatibility.

The reservoir is a combination of the XSPC dual bay reservoir along with a XSPC X20 750 pump. This pump has been revised and is much more reliable than previous revisions. It is now injection molded for seamless joints and this new revision 4 model is a black color.

This kit comes compete with all fittings, clamps, fans, mounting hardware and hose.

Note: Kit does NOT come with fluid or additive.

Features

  • Designed for Multi-core CPUs
  • Complete Kit
  • Top End Performance
  • Full Copper Base Water Block

Specifications

CPU Block
Compatibility: AMD Sockets 939, 754, 940, AM2, AM3
Intel Sockets LGA2011, LGA1366, LGA1156, 603, 604
*Requires mounting holes
Block: XSPC Raystorm – AMD and Intel
Sockets: AMD Sockets AM2, AM2+, AM3, AM3+
Intel Sockets LGA1366, LGA1156, LGA1155
Base Dimensions: 56mmx56mmx3mm
LED Support: 4x 3mm LED Holes
Radiator
Radiator: XSPC RS240
Dimensions: 121x35x277mm (WxDxH)
Ports: G1/4
Screws: 6-32 UNC
Fans: 2 x 120mm (4x with push/pull)
Reservoir
Reservoir: XSPC X20 750 Dual 5.25″ Pump / Reservoir Combo
Fitting Ports: 2 x G1/4″
Dimensions: 149 x 100 x 85mm (WxDxH)
Tubing and Fittings
Tubing: 2 Meters – 7/16″ x 5/8″ Clear
Fittings: 1/2″ Barb (Hose Clamps Included)
Pump
Pump: XSPC X20 750 (Black Revision 4)
Pump Performance: 750 lph
Delivery head: 1.8m
Voltage: 12V (4pin)
Fan
Fan: 2 x XSPC 120mm x 25mm Radiator / Chassis Fan – 1650 RPM
Size: 120mm x 25mm
Airflow: 65.2CFM
Noise: ~29dBA
Static Pressure: 1.8mmAq
Operating Voltage: 5.5 – 13.8V.
Connector: 3-Pin
Wire Length: 45cm
Included: RayStorm CPU Waterblock
X2O 750 Pump/Reservoir
RS240 Dual Radiator
G1/4″ to 1/2″ Barb (Black Chrome) x6
Plastic Hose Clip x6
XSPC 1650rpm 120mm Fan x2
120mm Fan Grill (Black) x2
Intel and AMD RayStorm Brackets
Socket 1366 and 1155/1154 Backplates
Socket AM2 and AM3 mounting kit
80mm to 120mm Radiator brackets
3mm Twin Blue LED with 4Pin Molex
5mm Blue LED with 4Pin Molex
2 Meters of Clear 7/16″ Hose
24pin ATX Bridge Tool
K2 Thermal Paste

One particular to take extra note of is that this kit does not come with fluid. It does however come with a bottle of IandH Dead Water (Biocide), so you will need to buy a gallon of distilled water or a liter of water cooling fluid. In spirit of “Value” I chose the first because a gallon of distilled at Wal-mart is only 88 cents which fits this value theme nicely.  Also noteworthy is the 1.8m head pump and low restriction Raystorm CPU block that should leave you with some extra pumping capacity to handle adding more to the loop later.  There are also several other nice features not expected in a value kit such as the LED modules for pump and block, the 24pin ATX bridge tool to make bleeding easy, and the external radiator mount brackets so you can install the kit on back or on top of cases with limited space.  There is quite a lot in just one box..

Logo-FrozenCPU