Unboxing Review
As will all reviews, I like to start with a little unboxing to look things over. Sorry for the slightly substandard photo quality this time. I started this review and photo shoot while I was in the middle of moving and didn’t have my dSLR to take all the photos.

Comes in a nice black printed box with clear plastic shrink-wrap protecting the entire box.

Removing the plastic shrink-wrap.

Unwrapped is a nice printed black box.

Box does show you some thermal performance relative to the box cooler on a 3770K. It also notes the noise level vs the older H100 has improved by about 1dBa demonstrating some improvement over the previous generation H100 in noise. Would be nice if they had some competitor data in there or at least the H100 thermal results compared, but that’s what is given for performance…not much.

Box notes standard 15mm fan spacing which is pretty much standard for 120mm radiators these days. It also notes the Magnetic mounting bracket which in practice works nicely to minimize loose parts when installing the pump/block.

Opening the box presents you with the user manual , solutions guide (other Corsair products), Warranty Info, and Warranty/RMA procedure. The very nice and long 5 year warranty is a big bonus and a serious thing to consider. While I don’t expect to keep hardware that long, they must feel pretty confident about the pump lifespan and low evaporation to warranty for that long.

The user manual is done well with good visual drawings showing how to install. The manual is broken down into Intel and AMD sections and done very well.


The manual looks fairly well written with good drawings to guide you along the way. I have no complaints about the installation guide, it is very well written and the installation is super easy anyhow, pretty much with heat sink experience could probably assemble this thing without even looking at the guide.
Here is a downloadable copy of the H100i manual to get a more detailed look at the installation:
http://www.corsair.com/us/media/cms/manual/49-000175_rev_AB_H100i_QSG_web.pdf

Packing does use an environmental friendly formed paper with each item individually bagged. A fairly well done packaging although I wouldn’t mind seeing better fin protection. I have heard a few forum members complain about bent fins. My sample was it pretty good condition, I would say better than average for a value radiator. Some bent fins is actually fairly common with value radiators and not something that affects performance at all.
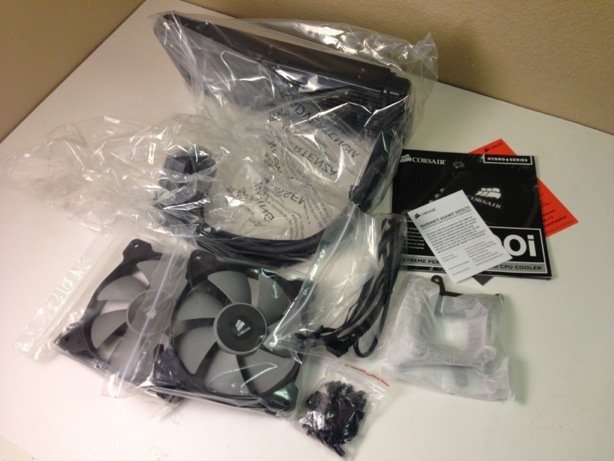
After taking everything out of the box.

After unbagging. On the left are the cables provided. One is the USB connection for corsair link, the other two are for connecting up to four PWM fans out of the pump fan controller. The other hardware I will explain in the photo below:

And next up are the fans…:

Notice the number of wires…four. These are the new revision 4 pin PWM capable fans.

A closer look at the pump to fan splitter and the fan plug, indeed these are the more desirable 4 pin PWM fans which is a revision over the prior generation 3 pin fans. 4 pin PWM fans do give you more options for speed control, but more importantly they are a revision that solves a high-pitched noise problem that happened on some of the 3 pin fans.
Speaking of plugs, here is what feeds the pump, a SATA power connector and the RPM monitoring 3 pin header.

That is nice to see as a SATA plug is more secure than molex. I did have one near melt down experience many moons ago where I “bumped” the molex connector on a pump working inside the case and didn’t notice the pump stopped working. The GPU only loop melted my GPU block and nearly burst the tubing, luckily I was sitting there and heard the water boiling in the GPU block. Anyhow, SATA is appreciated and a better connection than molex. I am also happy to see the pump monitoring wire which was lacking on my XSPC 750 pump kit.
Here are all the cords and cables.

To the left is the USB connector, one ends plugs into the pump and the other to the motherboard for software communication. Unfortunately, I could not use this during the testing because at the time Windows 8 wasn’t yet supported.
And the radiator..you can see a couple of very minor fins bent, but nothing major. The fin spacing was actually a bit more consistent than what I’ve seen before so no complaints.

I forgot to measure the fin spacing, but it is a little more dense than the H220. It looks more like the RS240 fin spacing than it does the H220. This means it is more optimized for high-speed fans but a little too dense for optimal performance using slow speed fans.

Here you see the sealed connections to the radiator are fixed with some sort of plastic formed clamp. These are not meant to be removed, but I understand it is possible by cutting the tubing and what’s left is a 3/8″ barb. The rubber hose looks a decent size and fairly flexible. My only issue with the hose is its length is too short. Upon my failed attempt at installing the radiator at the bottom of my Switch 810, I found the hoses were about 2″ too short.
Note: Very short hose length will limit installation options.
The kit is obviously intended for top installations only. While you could possibly modify the unit and extend the hoses yourself, there is no reservoir, so that’s well beyond basic kit vs kit testing.
And a close look at the pump/block and USB & Corsair Link ports below:

And these are the fan wire connectors in the photo below:

They are proprietary and require the corsair kit fan connectors. While I couldn’t get any communications out the USB ports (when doing the initial testing), the output of these fan ports did still work with the default throttling curve. It loaded some sort of thermal throttling routine that would dial fan speed to around 900 when cool and up to about 2600 after fully loaded for a while. The ramping up and down was actually pretty good, but I found the 1800-2600RPM noise levels were WAY too loud and would have liked to reduce the maximum.
The only way I was able to monitor was by making my own RPM jumper wires over to my fan controller from the pump and the two fans.
Here is the base of the block. While not a mirror finish, it does appear to be of decent smoothness.

It also comes with thermal interface material screen printed on the base. This does make it a little faster in installation and probably going to get more consistency between users, but it does mean you only get one shot at mounting. From what I understand it is pretty good TIM material by Dow Corning is what one user in the forums noted. I personally would prefer having a tube come in the kit where I can apply enough for a few mounts as needed, but it seems to work ok. While I didn’t try other TIM materials myself, I have heard that it’s pretty good stuff. They used to use one of the higher grade Shin Etsu formulas, and now the Dow Corning which is supposed to be better. My only concern is in regard to the TIM material drying out a bit and creating a thicker than necessary bond line thickness, particularly for users that don’t tighten the block down enough. I got a pretty good mount, but I think I could do better with a tube of good TIM rather than the slightly dry printed patch.
Overall regarding packaging and external review I was pleased for the price point. The radiator paint was good and generally all the parts feel of good quality and finishing.

Thanks Martin,
I’ll use your tips. I will cut the tubes to the size I need them to be and then re-assemble and bleed the kit out of the case.
Do you know that voltage is the pump using? if it is using the 5v rail maybe I can mod a cable to connect it to the 12v to speed it up a litle.. humm I can alreasy smell the smoke..
Using a reservoir is out of the question as there is no space for one on the case. It’s a mini-itx build with a ncases M1 case.
Hi Martin,
Hope you had a great Christmas ! And hope you have a safe and joyous New Year also!
Quick question, have you heard of that Kraken g10, the CPU AIO adapter for a GPU? It looks pretty cool and read some impressive reviews. Just wondering your thoughts on it. Also, do you know someone who sells a heatsink kit for a graphics card to use on the VRam and VRMs? Perhaps an assorted package of small heatsinks you could glue to the chips? I talked to a guy that was going to use 2 of these with H90s to cool 2 780s. He said he would get back to me when he has it up and running.
Take care
Steven
No personal experience, but this review:
http://www.pugetsystems.com/labs/articles/NZXT-Kraken-G10-Review-527/
Seems to indicate the VRM need more than the fan and noise is really not better than the stock HSF. I had a GPU only block on an old 8800GTX with passive ramsinks and a 120mm fan which seemed to do ok, but I do think you generally need the little Heatsinks and a fan close by to keep the rest of the card cool. In the end it doesn’t look nearly as nice as a full cover GPU block.
By the time you buy two AIO units and all the other bits, you could nearly buy lower end DIY watercooling that looks a lot better. might be fun to play and try, but that’s my limited experience take on it so far.
Thanks Martin, that is a good write up, liked the thermal images, they really tell a story. I sort of figured the same as you, the NZXT info says the fan will take care of VRAM and the VRMs, but it seems they are not. That is why I asked about a heatsink kit, to let this guy know.
Your right, after adding up the cost for everything, a full cover would be a lot better, but this guy got most of the stuff free so that is the way he is going. I will drop you a line when he gets back to me about how things went.
Take care
Steven
Nothing wrong with putting together a bunch of free or cheap parts and tinkering, it’s all good!
Hey Martin, first off I love your reviews. Always very thorough and well-controlled testing.
But I was wondering if you collected any data on the h100i built in fan outputs. I have a watercooling project in the works and I’m wanting to see if I can just plug my NZXT grid fan splitter (30 watt max) into one of the h100i’s 4 available fan headers and use that to control a 2nd radiators fans.
I couldn’t seem to find any specs on the max fan wattage so I was hoping you tested it.
No i didt’t but…you could probably make or buy one of the power supply fed splitters like the swiftech pwm splitter or one of the other brands that use only the pwm signal from the device and draw power direct from the power supply. The h100i newer models do use 4 pin pwm fans so the output should include PWM signal. You could make your own out of a spare fan molex adapter and a normal 4 pin Y splitter too. You just need to bypass the power and ground and draw them direct from molex or sata power to the PSU.
I would just recommend testing the H100i output voltage. If power out remains a constant 12v while reducing speeds, then you can be sure it is sending a regular PWM signal. Pretty sure it does, but I never checked. I also had no luck with link on windows 8 so I have no way of testing and bypassed the pump fan controller completely.
Of coarse you could also bypass the h100i fan controller and run PWM off the motherboard cpu header using speedfan as well on to multiple PWM 4 pin fans.
I like your scientific approach and trust your judgement
I’m owner of the h100 coupled with Noctuas (NF-F12) and confident with that
I’d like to move my hardware to a new home (namely a Lian Li TYR-X2000(F(N)))
therefore I’m looking for reviews about Coolermasters Nepton 140XL – ideally in Tandem with 7mm shroud/anti-vibration adapter and Arctic F14 PWM fans …
any plans to do something along this line? 😉
Sorry, no testing in the near future. I’m in the middle of my buggy building project. I also tend to feel you really need at least a 240 rad to gain the benefits of watercooling. I’ve been able to bring even the 240s to their knees and throttle my 3930 at lower fan speeds. A lot of high end air coolers are fairly competitive I think with many of the 120/140 CLCs. A noctua NH-D14 with a pair of Gentle Typhoon AP 45s running with PWM mods would probably outperform most of the CLCs of similar size and with lower noise.
thanks for your input *goes back to the drawing board^^*
.
.
.
New idea:
Swiftech H320 + Nexxos 180mm monsta rad + EK GPU full cover (GTX 680)
?
😀